- 하드 윈도우 복사
- asp.net Select
- javascript redirection
- asp.net core Select
- 타임피커
- swagger 500 error
- SSD 복사
- TempData
- asp.net core swagger
- 바코드 생성하기
- 404에러페이지
- JavaScript
- asp.net dropdownlist
- ASP.Net Core 404
- 말줄임표시
- ViewData
- ViewBag
- php 캐쉬제거
- 하드 마이그레이션
- javascript 바코드 생성
- Mac Oracle
- XSS방어
- 원격ftp
- 맥 오라클설치
- django 엑셀불러오기
- XSS PHP
- jquery 바코드생성
- asp ftp
- 강제이동
- simpe ftp
웹개발자의 기지개
[안드로이드] Volley 로 웹요청하고 응답받기1 - Get방식 본문
http 나 https 등 웹형식의 네트워크 교신을 할때 쓰레드와 Handler 등으로 다소 복잡한 코딩을 해야 한다.
이때 메인쓰레드에서는 UI를 직접 변경이 불가능하기 때문에 handler 를 통하여 정보를 보내고 이를 다시 받아 처리하는 등의 또다른 작업도 해야한다.
Volley 라는 놈은 이러한 쓰레드 작업을 알아서 해주고 자체 메소드 오버라이딩 만으로 웹의 응답처리를 간단히 할 수 있다.

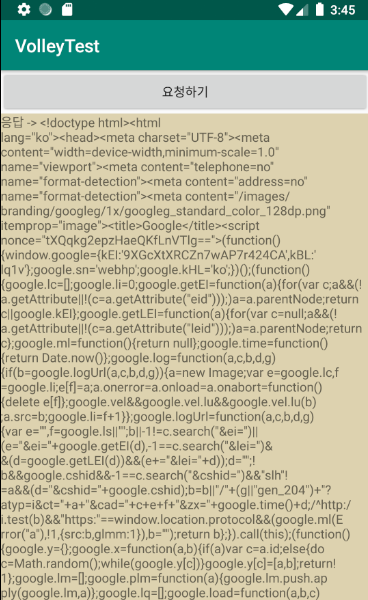
위의 실행화면은 요청하기 버튼을 클릭하면 https://www.google.co.kr 의 웹주소에 Get 방식으로 정보를 요청하고 응답결과를 아래 화면에 텍스트로 출력하는 간단한 예제내용이다.
[ AndroidManifest.xml ]
|
1
2
3
4
|
<uses-permission android:name="android.permission.INTERNET" />
<application
...
android:usesCleartextTraffic="true">
|
cs |
[ build.gradle ] (app)
|
1
2
3
|
dependencies {
implementation 'com.android.volley:volley:1.1.0'
}
|
cs |
volley 를 삽입하고, Sync Now 를 눌러 라이브러리를 추가한다.
[ activity_main.xml ]
|
1
2
3
4
5
6
7
8
9
10
11
12
13
14
15
16
17
18
19
20
21
22
23
24
25
26
27
28
29
30
|
<?xml version="1.0" encoding="utf-8"?>
<LinearLayout xmlns:android="http://schemas.android.com/apk/res/android"
xmlns:app="http://schemas.android.com/apk/res-auto"
xmlns:tools="http://schemas.android.com/tools"
android:layout_width="match_parent"
android:layout_height="match_parent"
android:orientation="vertical"
tools:context=".MainActivity">
<Button
android:id="@+id/button1"
android:text="요청하기"
android:layout_width="match_parent"
android:layout_height="wrap_content"/>
<ScrollView
android:id="@+id/scrollView1"
android:background="#DDD2AF"
android:layout_width="match_parent"
android:layout_height="match_parent">
<LinearLayout
android:layout_width="match_parent"
android:layout_height="match_parent">
<TextView
android:id="@+id/textView1"
android:layout_width="match_parent"
android:layout_height="wrap_content"/>
</LinearLayout>
</ScrollView>
</LinearLayout>
|
cs |
ScrollView 를 넣어서 그안에서 TextView에 응답 내용을 출력하도록 하였다.
[ MainActivity.java ]
|
1
2
3
4
5
6
7
8
9
10
11
12
13
14
15
16
17
18
19
20
21
22
23
24
25
26
27
28
29
30
31
32
33
34
35
36
37
38
39
40
41
42
43
44
45
46
47
48
49
50
51
52
53
54
55
56
57
58
59
60
61
62
63
64
65
66
67
68
69
70
71
72
73
74
75
76
77
78
79
80
81
82
83
|
import androidx.appcompat.app.AppCompatActivity;
import android.os.Bundle;
import android.view.View;
import android.widget.Button;
import android.widget.TextView;
import com.android.volley.AuthFailureError;
import com.android.volley.Request;
import com.android.volley.RequestQueue;
import com.android.volley.Response;
import com.android.volley.VolleyError;
import com.android.volley.toolbox.StringRequest;
import com.android.volley.toolbox.Volley;
import java.util.HashMap;
import java.util.Map;
public class MainActivity extends AppCompatActivity {
Button button1;
TextView textView1;
static RequestQueue requestQueue;
@Override
protected void onCreate(Bundle savedInstanceState) {
super.onCreate(savedInstanceState);
setContentView(R.layout.activity_main);
textView1 = findViewById(R.id.textView1);
button1 = findViewById(R.id.button1);
button1.setOnClickListener(new View.OnClickListener() {
@Override
public void onClick(View v) {
requestProcess();
}
});
// RequestQueue 객체생성
if (requestQueue == null) {
requestQueue = Volley.newRequestQueue(getApplicationContext());
}
}
public void requestProcess() {
String url = "https://www.google.co.kr";
StringRequest request = new StringRequest(
Request.Method.GET,
url,
new Response.Listener<String>() {
// 요청을 보내고 응답받았을때
@Override
public void onResponse(String response) {
println("응답 -> " + response);
}
},
new Response.ErrorListener() {
// 요청보내고 에러 발생시에 호출되는 리스너
@Override
public void onErrorResponse(VolleyError error) {
println("에러 -> " + error.getMessage());
}
}
) {
// POST 방식으로 요청할 경우에 전달하는 파라미터값들 지정
@Override
protected Map<String, String> getParams() throws AuthFailureError {
//return super.getParams();
Map<String,String> params = new HashMap<String,String>();
return params;
}
};
// 캐쉬기능을 끊다. 바로바로 내용처리되도록
request.setShouldCache(false);
requestQueue.add(request);
}
public void println(String data) {
textView1.setText(data + "\n");
}
}
|
cs |
참고 : 안드로이드 앱프로그래밍 - 정재곤님의 Volley 사용하기 소스 수정
https://developer.android.com/training/volley/simple
간단한 요청 보내기 | Android 개발자 | Android Developers
고급 단계에서는 RequestQueue를 만들고 Request 개체를 전달하여 Volley를 사용합니다. RequestQueue에서는 네트워크 작업을 실행하고 캐시를 읽고 쓰고 응답을 파싱하기 위해 작업자 스레드를 관리합니다. 요청에서 원시 응답을 파싱하고 Volley에서 파싱된 응답을 전달을 위해 기본 스레드에 돌려보냅니다. 이 과정에서는 RequestQueue를 설정해주는 Volley.newRequestQueue 편의 메서드를 사용하여 요청을 보내는
developer.android.com
[ 소스 추가 부연 ]
[ MainActivity.java ] - 소스 보완
|
1
2
3
4
5
6
7
8
9
10
11
12
13
14
15
16
17
18
19
20
21
22
23
24
25
26
27
28
29
30
31
32
33
34
|
public class MainActivity extends AppCompatActivity {
public static final String TAG = "MyRequestQueue";
static RequestQueue requestQueue;
protected void onCreate(Bundle savedInstanceState) {
......
// RequestQueue 객체생성
if (requestQueue == null) {
requestQueue = Volley.newRequestQueue(getApplicationContext());
}
}
public void requestProcess() {
......
// StringRequest 객체의 태그값을 지정
request.setTag(TAG);
// 캐쉬기능을 끊다. 바로바로 내용처리되도록
request.setShouldCache(false);
requestQueue.add(request);
}
@Override
protected void onStop() {
super.onStop();
if (requestQueue != null) {
// RequestQueue 의 TAG 값으로 지정된 Queue 안의 모든 request들을 취소한다.
requestQueue.cancelAll(TAG);
}
}
}
|
cs |
'안드로이드' 카테고리의 다른 글
| [안드로이드] Fragment를 통한 하단탭 예제1 (0) | 2020.05.22 |
|---|---|
| [안드로이드] Volley 로 웹요청하고 응답받기2 - Post방식 , 로그인-회원가입 (php,mysql 연동) (3) | 2020.04.21 |
| [안드로이드] 구글맵으로 GPS 현재위치 실시간 연동하기 (12) | 2020.04.18 |
| [안드로이드] RecyclerView 실전예제1 - json 내용을 읽어오기 (0) | 2020.04.16 |
| [안드로이드] 배경색의 투명도 (0) | 2020.04.05 |


