- jquery 바코드생성
- javascript redirection
- asp.net core swagger
- javascript 바코드 생성
- ViewData
- Mac Oracle
- XSS PHP
- ViewBag
- 404에러페이지
- simpe ftp
- 말줄임표시
- ASP.Net Core 404
- 타임피커
- 하드 마이그레이션
- swagger 500 error
- 강제이동
- asp.net core Select
- php 캐쉬제거
- django 엑셀불러오기
- JavaScript
- 원격ftp
- XSS방어
- TempData
- 하드 윈도우 복사
- asp.net Select
- asp ftp
- 바코드 생성하기
- asp.net dropdownlist
- SSD 복사
- 맥 오라클설치
웹개발자의 기지개
네비게이션 드로어 (Navigation Drawer) 를 활용하여 슬라이드 메뉴 만들기 1 본문
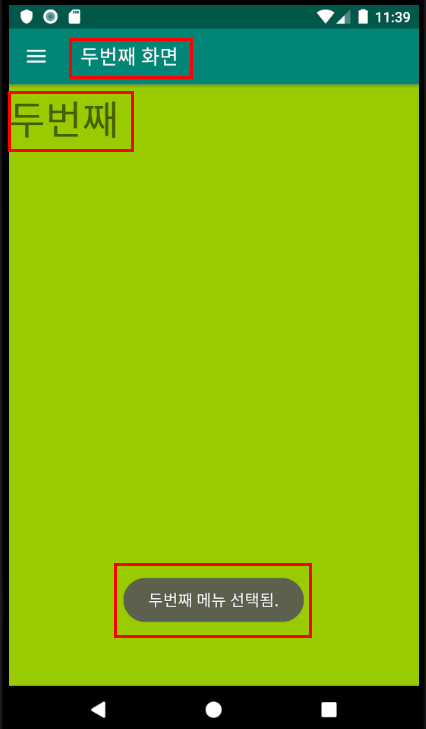
보통 화면 제일 상단 왼쪽에 위치하는 햄버거 메뉴 클릭시 스르륵 나타나는 슬라이드 메뉴를 간단히 구성해 보자.
일단 안드로이드 스튜디오에서 최초 Project 생성시 선택할 수 있는 템플릿 중에 아래와 같이 Naviagation Drawer Activity 슬라이드 메뉴 템플릿을 클릭하여 Project 를 새로 만들어 보자.


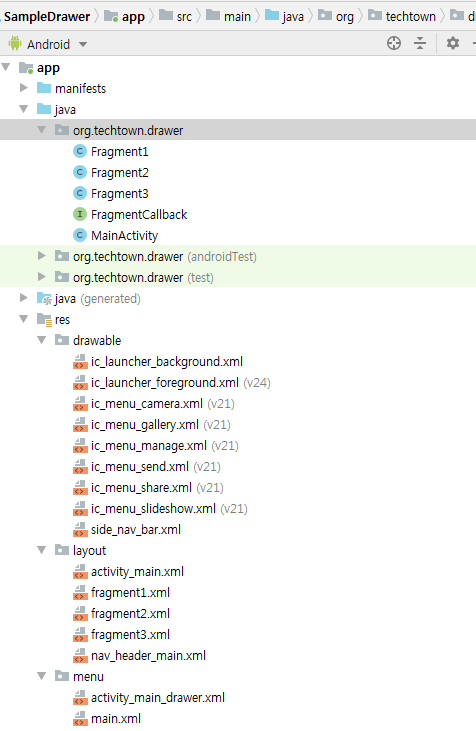
그러면 상단 파일 구성과 같이 다소 다양한 내용들이 주욱 나타난다.
대략 전체적으로 살펴보면
activity_main.xml 대표 레이아웃에는
DrawerLayout 으로 전체를 둘러치고 그안에는 상단부에는 AppBarLayout 과 그아래 하단부 FrameLayout 으로 구성해 놓고, 슬라이드 메뉴에 해당하는 NavigationView 를 구성해 놓고 있다.
[ activity_main.xml ] /res/layout/activity_main.xml
|
1
2
3
4
5
6
7
8
9
10
11
12
13
14
15
16
17
18
19
20
21
22
23
24
25
26
27
28
29
30
31
32
33
34
35
36
37
38
39
40
41
42
43
44
45
46
47
48
|
<?xml version="1.0" encoding="utf-8"?>
<android.support.v4.widget.DrawerLayout xmlns:android="http://schemas.android.com/apk/res/android"
xmlns:app="http://schemas.android.com/apk/res-auto"
xmlns:tools="http://schemas.android.com/tools"
android:id="@+id/drawer_layout"
android:layout_width="match_parent"
android:layout_height="match_parent"
android:fitsSystemWindows="true"
tools:openDrawer="start">
<android.support.design.widget.CoordinatorLayout
android:layout_width="match_parent"
android:layout_height="match_parent" >
<android.support.design.widget.AppBarLayout
android:layout_width="match_parent"
android:layout_height="wrap_content"
android:theme="@style/AppTheme.AppBarOverlay">
<android.support.v7.widget.Toolbar
android:id="@+id/toolbar"
android:layout_width="match_parent"
android:layout_height="?attr/actionBarSize"
android:background="?attr/colorPrimary"
app:popupTheme="@style/AppTheme.PopupOverlay" />
</android.support.design.widget.AppBarLayout>
<FrameLayout
android:id="@+id/container"
android:layout_width="match_parent"
android:layout_height="match_parent"
app:layout_behavior="@string/appbar_scrolling_view_behavior">
</FrameLayout>
</android.support.design.widget.CoordinatorLayout>
<android.support.design.widget.NavigationView
android:id="@+id/nav_view"
android:layout_width="wrap_content"
android:layout_height="match_parent"
android:layout_gravity="start"
android:fitsSystemWindows="true"
app:headerLayout="@layout/nav_header_main"
app:menu="@menu/activity_main_drawer" />
</android.support.v4.widget.DrawerLayout>
|
cs |
[ nav_header_main.xml ] /res/layout/nav_header_main.xml
|
1
2
3
4
5
6
7
8
9
10
11
12
13
14
15
16
17
18
19
20
21
22
23
24
25
26
27
28
29
30
31
32
33
34
35
36
37
|
<?xml version="1.0" encoding="utf-8"?>
<LinearLayout xmlns:android="http://schemas.android.com/apk/res/android"
xmlns:app="http://schemas.android.com/apk/res-auto"
android:layout_width="match_parent"
android:layout_height="@dimen/nav_header_height"
android:background="@drawable/side_nav_bar"
android:gravity="bottom"
android:orientation="vertical"
android:paddingLeft="@dimen/activity_horizontal_margin"
android:paddingTop="@dimen/activity_vertical_margin"
android:paddingRight="@dimen/activity_horizontal_margin"
android:paddingBottom="@dimen/activity_vertical_margin"
android:theme="@style/ThemeOverlay.AppCompat.Dark">
<ImageView
android:id="@+id/imageView"
android:layout_width="wrap_content"
android:layout_height="wrap_content"
android:contentDescription="@string/nav_header_desc"
android:paddingTop="@dimen/nav_header_vertical_spacing"
app:srcCompat="@mipmap/ic_launcher_round" />
<TextView
android:layout_width="match_parent"
android:layout_height="wrap_content"
android:paddingTop="@dimen/nav_header_vertical_spacing"
android:text="@string/nav_header_title"
android:textAppearance="@style/TextAppearance.AppCompat.Body1" />
<TextView
android:id="@+id/textView"
android:layout_width="wrap_content"
android:layout_height="wrap_content"
android:text="@string/nav_header_subtitle" />
</LinearLayout>
|
cs |

[ fragment1.xml ] /res/layout/fragment1.xml - 프래그먼트1 형태의 내용 부분
|
1
2
3
4
5
6
7
8
9
10
11
12
13
14
15
16
17
18
|
<?xml version="1.0" encoding="utf-8"?>
<android.support.constraint.ConstraintLayout xmlns:android="http://schemas.android.com/apk/res/android"
xmlns:app="http://schemas.android.com/apk/res-auto"
xmlns:tools="http://schemas.android.com/tools"
android:layout_width="match_parent"
android:layout_height="match_parent"
android:background="@android:color/holo_blue_bright">
<TextView
android:id="@+id/textView"
android:layout_width="wrap_content"
android:layout_height="wrap_content"
android:layout_marginTop="8dp"
android:text="첫번째"
android:textSize="40dp"
app:layout_constraintStart_toStartOf="parent"
app:layout_constraintTop_toTopOf="parent" />
</android.support.constraint.ConstraintLayout>
|
cs |

[ fragment2.xml ] /res/layout/fragment2.xml
|
1
2
3
4
5
6
7
8
9
10
11
12
13
14
15
16
17
18
|
<?xml version="1.0" encoding="utf-8"?>
<android.support.constraint.ConstraintLayout xmlns:android="http://schemas.android.com/apk/res/android"
xmlns:app="http://schemas.android.com/apk/res-auto"
xmlns:tools="http://schemas.android.com/tools"
android:layout_width="match_parent"
android:layout_height="match_parent"
android:background="@android:color/holo_green_light">
<TextView
android:id="@+id/textView"
android:layout_width="wrap_content"
android:layout_height="wrap_content"
android:layout_marginTop="8dp"
android:text="두번째"
android:textSize="40dp"
app:layout_constraintStart_toStartOf="parent"
app:layout_constraintTop_toTopOf="parent" />
</android.support.constraint.ConstraintLayout>
|
cs |

[ fragment3.xml ] /res/layout/fragment3.xml
|
1
2
3
4
5
6
7
8
9
10
11
12
13
14
15
16
17
18
|
<?xml version="1.0" encoding="utf-8"?>
<android.support.constraint.ConstraintLayout xmlns:android="http://schemas.android.com/apk/res/android"
xmlns:app="http://schemas.android.com/apk/res-auto"
xmlns:tools="http://schemas.android.com/tools"
android:layout_width="match_parent"
android:layout_height="match_parent"
android:background="@android:color/holo_orange_light">
<TextView
android:id="@+id/textView"
android:layout_width="wrap_content"
android:layout_height="wrap_content"
android:layout_marginTop="8dp"
android:text="세번째"
android:textSize="40dp"
app:layout_constraintStart_toStartOf="parent"
app:layout_constraintTop_toTopOf="parent" />
</android.support.constraint.ConstraintLayout>
|
cs |

[ activity_main_drawer.xml ] /res/menu/activity_main_drawer.xml
|
1
2
3
4
5
6
7
8
9
10
11
12
13
14
15
16
17
18
19
20
21
|
<?xml version="1.0" encoding="utf-8"?>
<menu xmlns:android="http://schemas.android.com/apk/res/android"
xmlns:tools="http://schemas.android.com/tools"
tools:showIn="navigation_view">
<group android:checkableBehavior="single">
<item
android:id="@+id/menu1"
android:icon="@drawable/ic_menu_camera"
android:title="Import" />
<item
android:id="@+id/menu2"
android:icon="@drawable/ic_menu_gallery"
android:title="Gallery" />
<item
android:id="@+id/menu3"
android:icon="@drawable/ic_menu_slideshow"
android:title="Slideshow" />
</group>
</menu>
|
cs |

[ side_nav_bar.xml ] /res/drawable/side_nav_bar.xml
|
1
2
3
4
5
6
7
8
9
|
<shape xmlns:android="http://schemas.android.com/apk/res/android"
android:shape="rectangle">
<gradient
android:angle="135"
android:centerColor="#009688"
android:endColor="#00695C"
android:startColor="#4DB6AC"
android:type="linear" />
</shape>
|
cs |

[ Fragment1.java ]
|
1
2
3
4
5
6
7
8
9
10
11
|
public class Fragment1 extends Fragment {
@Nullable
@Override
public View onCreateView(LayoutInflater inflater, @Nullable ViewGroup container, @Nullable Bundle savedInstanceState) {
ViewGroup rootView = (ViewGroup) inflater.inflate(R.layout.fragment1, container, false);
return rootView;
}
}
|
cs |
[ Fragment2.java ]
|
1
2
3
4
5
6
7
8
9
10
11
12
|
public class Fragment2 extends Fragment {
@Nullable
@Override
public View onCreateView(LayoutInflater inflater, @Nullable ViewGroup container, @Nullable Bundle savedInstanceState) {
ViewGroup rootView = (ViewGroup) inflater.inflate(R.layout.fragment2, container, false);
return rootView;
}
}
|
cs |
[ Fragment3.java ]
|
1
2
3
4
5
6
7
8
9
10
11
|
public class Fragment3 extends Fragment {
@Nullable
@Override
public View onCreateView(LayoutInflater inflater, @Nullable ViewGroup container, @Nullable Bundle savedInstanceState) {
ViewGroup rootView = (ViewGroup) inflater.inflate(R.layout.fragment3, container, false);
return rootView;
}
}
|
cs |
[ FragmentCallback.java ]
|
1
2
3
4
5
6
7
8
9
10
|
package org.techtown.drawer;
import android.os.Bundle;
public interface FragmentCallback {
public void onFragmentSelected(int position, Bundle bundle);
}
|
cs |
[ MainActivity.java ]
|
1
2
3
4
5
6
7
8
9
10
11
12
13
14
15
16
17
18
19
20
21
22
23
24
25
26
27
28
29
30
31
32
33
34
35
36
37
38
39
40
41
42
43
44
45
46
47
48
49
50
51
52
53
54
55
56
57
58
59
60
61
62
63
64
65
66
67
68
69
70
71
72
73
74
75
76
77
78
79
80
81
82
83
84
85
|
public class MainActivity extends AppCompatActivity
implements NavigationView.OnNavigationItemSelectedListener, FragmentCallback {
Fragment1 fragment1;
Fragment2 fragment2;
Fragment3 fragment3;
Toolbar toolbar;
@Override
protected void onCreate(Bundle savedInstanceState) {
super.onCreate(savedInstanceState);
setContentView(R.layout.activity_main);
toolbar = findViewById(R.id.toolbar);
setSupportActionBar(toolbar);
DrawerLayout drawer = findViewById(R.id.drawer_layout);
ActionBarDrawerToggle toggle = new ActionBarDrawerToggle(
this, drawer, toolbar, R.string.navigation_drawer_open, R.string.navigation_drawer_close);
drawer.addDrawerListener(toggle);
toggle.syncState();
NavigationView navigationView = findViewById(R.id.nav_view);
navigationView.setNavigationItemSelectedListener(this);
fragment1 = new Fragment1();
fragment2 = new Fragment2();
fragment3 = new Fragment3();
// 처음에는 fragment1 을 화면에 띄운다.
getSupportFragmentManager().beginTransaction().add(R.id.container, fragment1).commit();
}
@Override
public void onBackPressed() {
DrawerLayout drawer = findViewById(R.id.drawer_layout);
if (drawer.isDrawerOpen(GravityCompat.START)) {
drawer.closeDrawer(GravityCompat.START);
} else {
super.onBackPressed();
}
}
@Override
public boolean onNavigationItemSelected(MenuItem item) {
int id = item.getItemId();
if (id == R.id.menu1) {
Toast.makeText(this, "첫번째 메뉴 선택됨.", Toast.LENGTH_LONG).show();
onFragmentSelected(0, null);
} else if (id == R.id.menu2) {
Toast.makeText(this, "두번째 메뉴 선택됨.", Toast.LENGTH_LONG).show();
onFragmentSelected(1, null);
} else if (id == R.id.menu3) {
Toast.makeText(this, "세번째 메뉴 선택됨.", Toast.LENGTH_LONG).show();
onFragmentSelected(2, null);
}
DrawerLayout drawer = findViewById(R.id.drawer_layout);
drawer.closeDrawer(GravityCompat.START);
return true;
}
@Override
public void onFragmentSelected(int position, Bundle bundle) {
Fragment curFragment = null;
if (position == 0) {
curFragment = fragment1;
toolbar.setTitle("첫번째 화면");
} else if (position == 1) {
curFragment = fragment2;
toolbar.setTitle("두번째 화면");
} else if (position == 2) {
curFragment = fragment3;
toolbar.setTitle("세번째 화면");
}
// curFragment 화면으로 변경시킨다.
getSupportFragmentManager().beginTransaction().replace(R.id.container, curFragment).commit();
}
}
|
cs |


'안드로이드' 카테고리의 다른 글
| 안드로이드 앱배포하기 apk 만들기 (0) | 2019.12.24 |
|---|---|
| 안드로이드 입문 연습문제 3문항 - CheckBox, RadioButton, EditText, Spinner, 이벤트연습 (0) | 2019.11.30 |
| 스피너(Spinner) 와 다이얼로그 대화창 (AlertDialog) 연습1 (0) | 2019.11.21 |
| ListView 리스트뷰 연습2 - 동적으로 아이템 추가 삭제 (0) | 2019.11.19 |
| ListView 리스트뷰 연습1 - 아이템 단일선택, 다중선택가능 (1) | 2019.11.19 |


