
- simpe ftp
- XSS PHP
- 강제이동
- 맥 오라클설치
- 하드 윈도우 복사
- ViewBag
- TempData
- asp ftp
- asp.net Select
- asp.net core swagger
- asp.net core Select
- 바코드 생성하기
- django 엑셀불러오기
- 하드 마이그레이션
- Mac Oracle
- 타임피커
- javascript redirection
- XSS방어
- php 캐쉬제거
- javascript 바코드 생성
- 원격ftp
- ViewData
- 말줄임표시
- asp.net dropdownlist
- SSD 복사
- ASP.Net Core 404
- 404에러페이지
- jquery 바코드생성
- JavaScript
- swagger 500 error
웹개발자의 기지개
동적으로 EditText 생성 및 생성된 EditText 리셋 시키기2 본문
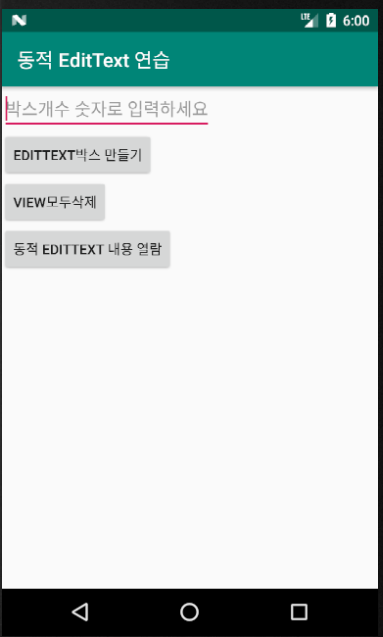
사용자로부터 임의의 EditText 변수 개수를 입력받아서 그 개수만큼 동적으로 EditText 박스를 바로 만들어내고,
이 동적 내용들을 새로운 팝업 Activity에 결과 값으로 확인해 보는 예제를 나름 만들어 보도록 하자.
물론 아래의 '동적으로 EditText 생성 및 생성된 EditText 리셋 시키기1' 예제에서 잠시나마 동적으로 EditText 박스를 만들어내는 단순한 예제는 만들어 봤으나, 이번에는 좀더 팝업을 띄워 Intent 정보도 보내고 Activity의 수명주기도 잠시 이용해서, 부모Activity 를 다시 화면상에 띄웠을때 처리하는 방안도 좀더 고려해서 살펴 보았다.
https://wonpaper.tistory.com/149
동적으로 EditText 생성 및 생성된 EditText 리셋 시키기1
사용자로부터 숫자로 EditText 갯수를 입력받아서 동적으로 EditText 를 이용하고 싶을때 한번 나름 고려해서 기본 예제를 작업해 보았다. 먼저 실행 이미지를 살펴 보장~~ [ activity_main.xml ] 1 2 3 4 5 6 7..
wonpaper.tistory.com
[ 실행화면 ]

[ activity_main.xml ]
|
1
2
3
4
5
6
7
8
9
10
11
12
13
14
15
16
17
18
19
20
21
22
23
24
25
26
27
28
29
30
31
32
33
34
35
36
37
38
39
40
41
42
43
44
45
46
47
|
<?xml version="1.0" encoding="utf-8"?>
<LinearLayout xmlns:android="http://schemas.android.com/apk/res/android"
xmlns:app="http://schemas.android.com/apk/res-auto"
xmlns:tools="http://schemas.android.com/tools"
android:layout_width="match_parent"
android:layout_height="match_parent"
android:orientation="vertical"
tools:context=".MainActivity">
<EditText
android:id="@+id/editText1"
android:inputType="number"
android:layout_width="wrap_content"
android:layout_height="wrap_content" android:hint="박스개수 숫자로 입력하세요" />
<Button
android:id="@+id/button1"
android:layout_width="wrap_content"
android:layout_height="wrap_content" android:text="EditText박스 만들기" />
<Button android:id="@+id/button2"
android:layout_width="wrap_content"
android:layout_height="wrap_content"
android:text="view모두삭제"/>
<Button
android:id="@+id/button3"
android:layout_width="wrap_content"
android:layout_height="wrap_content"
android:text="동적 EditText 내용 열람"/>
<TextView
android:id="@+id/tx"
android:layout_width="wrap_content"
android:layout_height="wrap_content" />
<LinearLayout
android:id="@+id/ll"
android:orientation="vertical"
android:layout_width="match_parent"
android:layout_height="wrap_content">
</LinearLayout>
</LinearLayout>
|
cs |
[ MainActivity.java ]
|
1
2
3
4
5
6
7
8
9
10
11
12
13
14
15
16
17
18
19
20
21
22
23
24
25
26
27
28
29
30
31
32
33
34
35
36
37
38
39
40
41
42
43
44
45
46
47
48
49
50
51
52
53
54
55
56
57
58
59
60
61
62
63
64
65
66
67
68
69
70
71
72
73
74
75
76
77
78
79
80
81
82
83
84
85
86
87
|
public class MainActivity extends AppCompatActivity {
EditText editText1;
LinearLayout ll;
ArrayList<String> strList;
int num = 0;
@Override
protected void onCreate(Bundle savedInstanceState) {
super.onCreate(savedInstanceState);
setContentView(R.layout.activity_main);
setTitle("동적 EditText 연습");
ll = findViewById(R.id.ll);
strList = new ArrayList<String>();
editText1 = findViewById(R.id.editText1);
Button button1 = findViewById(R.id.button1);
Button button2 = findViewById(R.id.button2);
Button button3 = findViewById(R.id.button3);
// 숫자 개수만큼 EditText 추가 생성
button1.setOnClickListener(new View.OnClickListener() {
@Override
public void onClick(View v) {
num = Integer.parseInt(editText1.getText().toString());
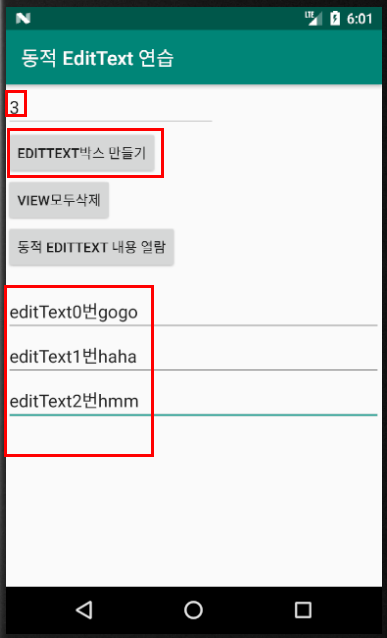
for (int i = 0; i< num; i++) {
final EditText et = new EditText(getApplicationContext());
LinearLayout.LayoutParams p = new LinearLayout.LayoutParams(ViewGroup.LayoutParams.MATCH_PARENT,ViewGroup.LayoutParams.WRAP_CONTENT);
et.setLayoutParams(p);
et.setText("editText" + i + "번");
et.setId(i);
ll.addView(et);
}
}
});
button2.setOnClickListener(new View.OnClickListener() {
@Override
public void onClick(View v) {
llReset();
}
});
// 새 팝업창으로 값넘기기
button3.setOnClickListener(new View.OnClickListener() {
@Override
public void onClick(View v) {
if (num > 0) {
for (int i=0;i<num;i++) {
EditText et = (EditText) ll.getChildAt(i);
strList.add(et.getText().toString());
}
Intent intent = new Intent(getApplicationContext(), PopActivity.class);
intent.addFlags(Intent.FLAG_ACTIVITY_SINGLE_TOP|Intent.FLAG_ACTIVITY_CLEAR_TOP);
intent.putExtra("num", num);
intent.putStringArrayListExtra("strList", strList);
startActivity(intent);
} else {
Toast.makeText(getApplicationContext(),"EditText 박스 만들기 버튼을 눌러 박스를 만들어 주세요.",Toast.LENGTH_SHORT).show();
}
}
});
}
@Override
protected void onRestart() {
super.onRestart();
llReset();
}
// EditText박스 모두 리셋
private void llReset() {
ll.removeAllViews();
strList.clear();
num = 0;
editText1.setText("");
}
}
|
cs |
위의 소스에서 라인29~ 31라인이 for문으로 입력한 개수만큼 돌려서 EditText 변수를 동적으로 만들어 내고 있고,
Button3 클릭시 라인55 ~ 58 사이에 strList (ArrayList) 로 add 시켜서, 새팝업 Activity에 Intent를 넘기고 있다.
그리고, 중요한것은 라인 75 ~ 78처럼 현재 부모 MainActivity 에서 자식인 팝업 PopActivity로 Intent를 보냈다가 팝업에서 창닫기로 팝업창을 닫았을때, 다시 부모창으로 돌아올때에 그전의 strList 와 num 값을 초기화 리셋시키는 과정이 필요한데 이때에 부모창이 다시 화면에 띄워지는 과정에서 등장하는 개념이 Activity 수명주기이다.
다시 창이 불러질때 onRestart - onStart - onResume 형태로 이벤트가 이루어지는데 여기서는 onRestart 를 다시 오버라이딩해서 이부분에서 리셋시키는 내용을 적용시켰다.
[ activity_pop.xml ]
|
1
2
3
4
5
6
7
8
9
10
11
12
13
14
15
16
17
18
19
20
21
22
23
24
25
26
|
<?xml version="1.0" encoding="utf-8"?>
<androidx.constraintlayout.widget.ConstraintLayout xmlns:android="http://schemas.android.com/apk/res/android"
xmlns:app="http://schemas.android.com/apk/res-auto"
xmlns:tools="http://schemas.android.com/tools"
android:layout_width="match_parent"
android:layout_height="match_parent"
android:background="#bca5a5"
tools:context=".PopActivity">
<TextView
android:id="@+id/textView1"
android:layout_width="match_parent"
android:layout_height="wrap_content"
/>
<Button
android:id="@+id/button1"
android:layout_width="wrap_content"
android:layout_height="wrap_content"
android:layout_marginStart="148dp"
android:layout_marginTop="76dp"
android:text="창닫기"
app:layout_constraintStart_toStartOf="parent"
app:layout_constraintTop_toTopOf="@+id/textView1" />
</androidx.constraintlayout.widget.ConstraintLayout>
|
cs |
[ PopActivity.java ]
|
1
2
3
4
5
6
7
8
9
10
11
12
13
14
15
16
17
18
19
20
21
22
23
24
25
26
27
28
29
30
31
32
33
|
public class PopActivity extends AppCompatActivity {
TextView textView1;
Button button1;
@Override
protected void onCreate(Bundle savedInstanceState) {
super.onCreate(savedInstanceState);
setContentView(R.layout.activity_pop);
setTitle("동적 EditText 연습 - 팝업 넘어온값 조회");
textView1 = findViewById(R.id.textView1);
button1 = findViewById(R.id.button1);
Intent intent = getIntent();
int num = intent.getIntExtra("num",0);
ArrayList<String> strList = intent.getStringArrayListExtra("strList");
StringBuffer sb = new StringBuffer();
for (int i=0;i<strList.size();i++) {
sb.append(strList.get(i).toString() + "\r\n");
}
textView1.setText(sb);
button1.setOnClickListener(new View.OnClickListener() {
@Override
public void onClick(View v) {
finish();
}
});
}
}
|
cs |
'안드로이드' 카테고리의 다른 글
| 커스텀 다이얼로그 대화창 ( Custom Dialog )연습 1 (0) | 2019.11.19 |
|---|---|
| 옵션 메뉴 연습하기1 (0) | 2019.11.19 |
| 동적으로 EditText 생성 및 생성된 EditText 리셋 시키기1 (0) | 2019.11.05 |
| listener 에서 return값 true 와 false (0) | 2019.11.05 |
| Unable to resolve dependency for ':app@debug/compileClasspath': Could not find any version that matches com.android.support:appcompat-v7:29.+. 에러발생 (0) | 2019.10.14 |


