
Notice
Recent Posts
Recent Comments
Tags
- XSS방어
- javascript 유효성체크
- javascript redirection
- javascript 바코드 생성
- ViewData
- javascript 바코드스캔
- 바코드 생성하기
- 파일업로드 유효성체크
- asp.net dropdownlist
- ViewBag
- 하드 윈도우 복사
- 맥 오라클설치
- jquery 바코드생성
- 강제이동
- XSS PHP
- Mac Oracle
- php 캐쉬제거
- TempData
- 하드 마이그레이션
- 말줄임표시
- asp.net Select
- asp.net core Select
- 파일업로드 체크
- 타임피커
- 404에러페이지
- 바코드 스캔하기
- jquery 바코드
- ASP.Net Core 404
- django 엑셀불러오기
- SSD 복사
웹개발자의 기지개
커스텀 다이얼로그 대화창 ( Custom Dialog )연습 1 본문
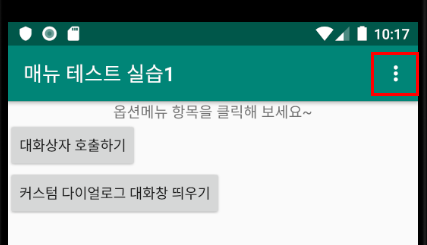
버튼 클릭시 화면중앙에 간단히 팝업되는 다이얼로그 창을 한번 만들어 보고,
좀더 나아가서 커스텀으로 내가 원하는 xml 디자인형식 화면으로 다이얼로그 창을 띄워보도록 하자.
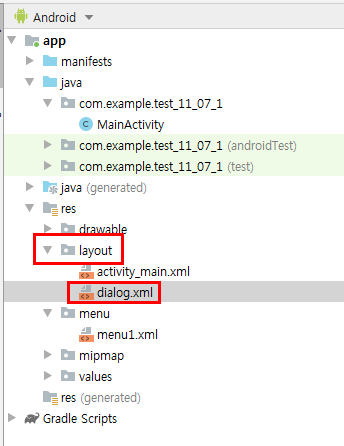
우선 커스텀 다이얼로그 xml 디자인창 파일을 만든다.
/res/layout/dialog.xml
[ dialog.xml ] - 커스텀 다이얼로그 xml
|
1
2
3
4
5
6
7
8
9
10
11
12
13
14
15
16
17
18
19
20
21
22
|
<?xml version="1.0" encoding="utf-8"?>
<LinearLayout xmlns:android="http://schemas.android.com/apk/res/android"
android:orientation="vertical" android:layout_width="match_parent"
android:layout_height="match_parent">
<EditText
android:layout_width="wrap_content"
android:layout_height="wrap_content"
android:id="@+id/editText1" android:ems="10"/>
<Button
android:id="@+id/btn1"
android:layout_width="wrap_content"
android:layout_height="wrap_content" android:text="버튼입니다." />
<CheckBox
android:layout_width="wrap_content"
android:layout_height="wrap_content"
android:text="동의합니다."
android:id="@+id/chk1"/>
</LinearLayout>
|
cs |
[ activity_main.xml ]
|
1
2
3
4
5
6
7
8
9
10
11
12
13
14
15
16
17
18
19
20
21
22
23
24
25
26
27
28
29
|
<?xml version="1.0" encoding="utf-8"?>
<LinearLayout xmlns:android="http://schemas.android.com/apk/res/android"
xmlns:app="http://schemas.android.com/apk/res-auto"
xmlns:tools="http://schemas.android.com/tools"
android:layout_width="match_parent"
android:layout_height="match_parent"
android:orientation="vertical"
android:id="@+id/ll"
tools:context=".MainActivity">
<TextView
android:id="@+id/textView1"
android:gravity="center_horizontal"
android:layout_width="match_parent"
android:textSize="15dp"
android:layout_height="wrap_content" android:text="옵션메뉴 항목을 클릭해 보세요~"/>
<Button
android:id="@+id/button1"
android:layout_width="wrap_content"
android:layout_height="wrap_content" android:text="대화상자 호출하기"/>
<Button
android:id="@+id/button2"
android:layout_width="wrap_content"
android:layout_height="wrap_content" android:text="커스텀 다이얼로그 대화창 띄우기"/>
</LinearLayout>
|
cs |
[ MainActivity.java ]
|
1
2
3
4
5
6
7
8
9
10
11
12
13
14
15
16
17
18
19
20
21
22
23
24
25
26
27
28
29
30
31
32
33
34
35
36
37
38
39
40
41
42
43
44
45
46
47
48
49
50
51
52
53
54
55
56
57
58
59
60
61
62
63
64
65
66
67
68
69
70
71
72
73
74
75
|
public class MainActivity extends AppCompatActivity {
LinearLayout ll;
TextView textView1;
Button button1,button2;
@Override
protected void onCreate(Bundle savedInstanceState) {
super.onCreate(savedInstanceState);
setContentView(R.layout.activity_main);
setTitle("매뉴 테스트 실습1");
ll = findViewById(R.id.ll);
textView1 = findViewById(R.id.textView1);
button1 = findViewById(R.id.button1);
button2 = findViewById(R.id.button2);
button1.setOnClickListener(new View.OnClickListener() {
@Override
public void onClick(View view) {
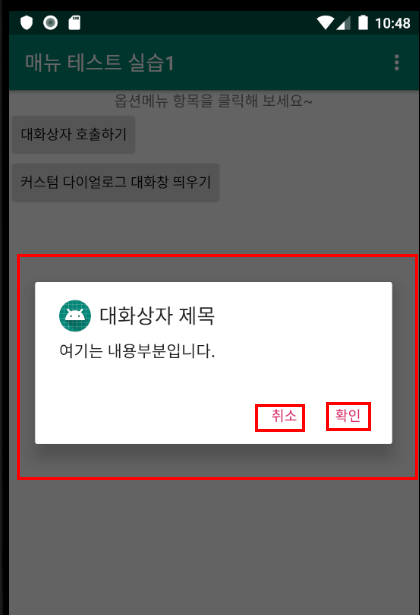
AlertDialog.Builder dlg = new AlertDialog.Builder(MainActivity.this);
dlg.setTitle("대화상자 제목").setMessage("여기는 내용부분입니다.")
.setIcon(R.mipmap.ic_launcher)
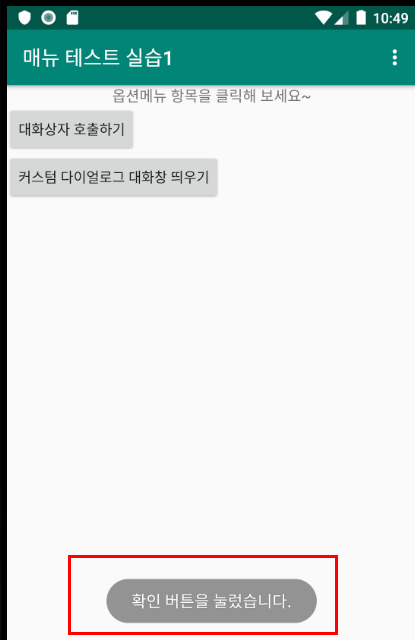
.setPositiveButton("확인", new DialogInterface.OnClickListener() {
@Override
public void onClick(DialogInterface dialogInterface, int i) {
Toast.makeText(getApplicationContext(),"확인 버튼을 눌렀습니다.",Toast.LENGTH_SHORT).show();
}
})
.setNegativeButton("취소", new DialogInterface.OnClickListener() {
@Override
public void onClick(DialogInterface dialogInterface, int i) {
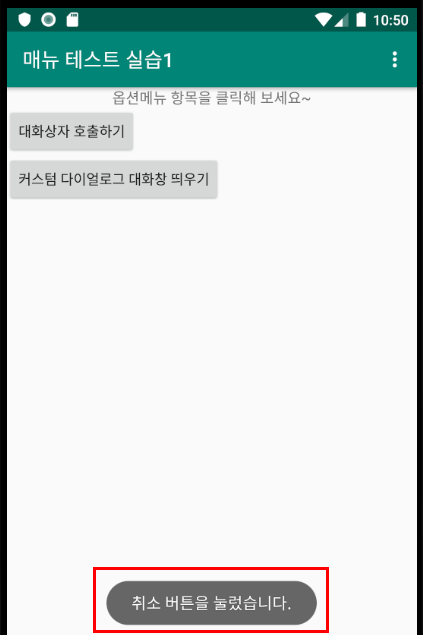
Toast.makeText(getApplicationContext(),"취소 버튼을 눌렀습니다.",Toast.LENGTH_SHORT).show();
}
})
.setCancelable(false)
.show();
}
});
button2.setOnClickListener(new View.OnClickListener() {
@Override
public void onClick(View view) {
final LinearLayout layout = (LinearLayout)View.inflate(getApplicationContext(),R.layout.dialog,null);
AlertDialog.Builder dialog = new AlertDialog.Builder(MainActivity.this);
dialog.setTitle("커스텀 다이얼로그 제목").setMessage("다이얼로그 대화창 내용입니다.")
.setIcon(R.drawable.ic_launcher_foreground)
.setView(layout)
.setPositiveButton("확인", new DialogInterface.OnClickListener() {
@Override
public void onClick(DialogInterface dialogInterface, int i) {
Toast.makeText(getApplicationContext(),"확인 버튼을 눌렀습니다.",Toast.LENGTH_SHORT).show();
}
})
.setNegativeButton("취소", new DialogInterface.OnClickListener() {
@Override
public void onClick(DialogInterface dialogInterface, int i) {
Toast.makeText(getApplicationContext(),"취소 버튼을 눌렀습니다.",Toast.LENGTH_SHORT).show();
}
})
.setCancelable(false)
.show();
}
});
}
}
|
cs |
20라인의 AlertDialog는 기본형의 다이얼로그 동작 부분이고,
50라인의 AlertDialog는 커스텀 다이얼로그 동작 부분이다.
예제에서 커스텀 다이얼로그는 부모창인 LinearLayout 에서 dialog.xml 을 inflate 시켜서 화면에 띄우고 있다.

'안드로이드' 카테고리의 다른 글
| ListView 리스트뷰 연습2 - 동적으로 아이템 추가 삭제 (0) | 2019.11.19 |
|---|---|
| ListView 리스트뷰 연습1 - 아이템 단일선택, 다중선택가능 (0) | 2019.11.19 |
| 옵션 메뉴 연습하기1 (0) | 2019.11.19 |
| 동적으로 EditText 생성 및 생성된 EditText 리셋 시키기2 (2) | 2019.11.11 |
| 동적으로 EditText 생성 및 생성된 EditText 리셋 시키기1 (0) | 2019.11.05 |
'안드로이드' Related Articles
more


Comments